
Microsoft Certified Power Platform Functional Consultant Associate · Free Practice Question Medium
Question 3
To create a custom connector, you must describe the API you want to connect to, so that the connector understands the API's operations and data structures.
What are the prerequisites needed to create a custom connector using Postman?
-
A
A Power Apps subscription
-
B
A Postman collection
-
C
A Power Automate subscription
-
D
A Postman collection and either a Power Apps or Power Automate subscription
Reveal correct answer
Correct answer: D
Explanation
A Postman collection and a subscription for either Power Apps or Power Automate are the prerequisites needed to create a custom connector using Postman.
Use postman for your custom connector
Postman is an app for making HTTP requests. Postman collections help you organize and group related API requests. Collections can make custom connector development faster and easier if you don't have an OpenAPI definition for your API.
Create a Postman collection for a custom connector
There are some prerequisites needed to create a Postman collection for a custom connector:
Create an HTTP request for the API
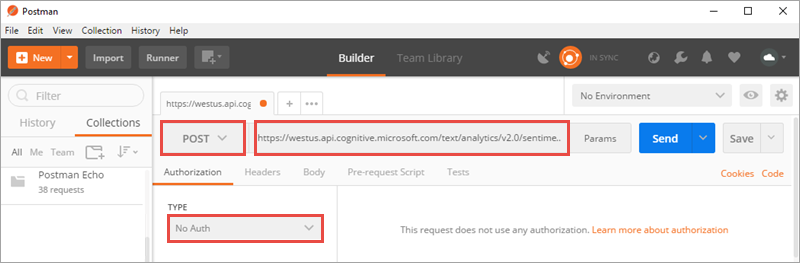
In Postman, on the Builder tab, select the HTTP method, enter the request URL for the API endpoint, and select an authorization protocol.

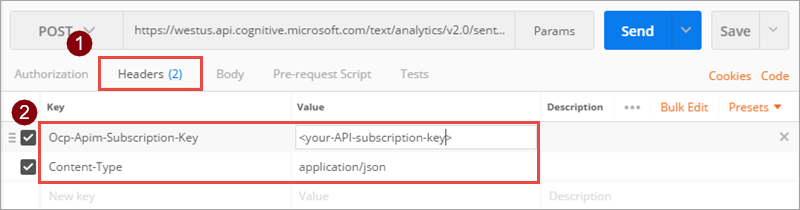
Enter key-value pairs for the request header. For common HTTP headers, you can select from the drop-down list.

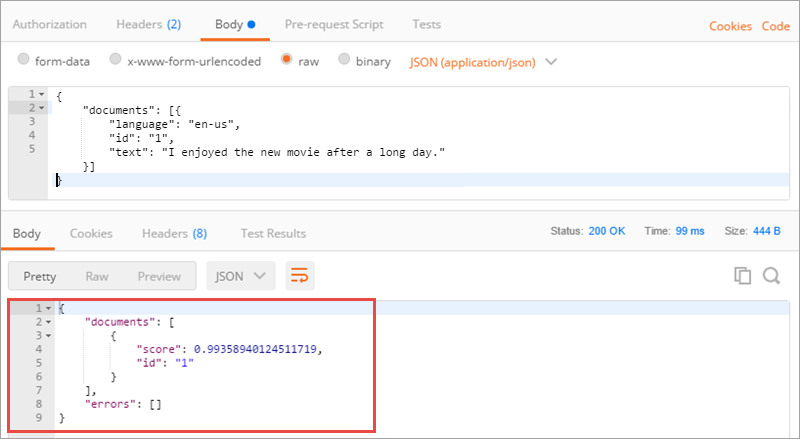
Enter content that you want to send in the request body. To check that the request works by getting a response back, select Send.

- JSON
- {
- “documents”: [{
- “language”: “en-us”,
- “id”: “1”,
- “text”: “I enjoyed the new movie after a long day.”
- }]
- }
The response field contains the full response from the API, including the result or an error, if any occurred.
Save the collection
Select Save.

Under Save Request, enter a request name and a description. The custom connector uses these values for the API operation summary and description.


Choose + Create Collection and provide a collection name. The custom connector uses this value when you call the API. Select the check mark, which creates a collection folder, then choose Save to SentimentDemo.


Save the request response
Now that you've saved your request, you can save the response. That way, the response appears as an example when you load the request later.
Above the response window, select Save Response.
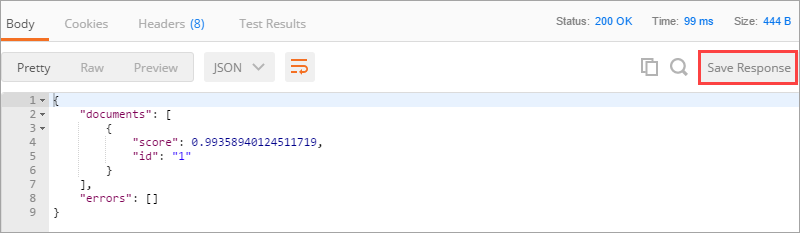
Custom connectors support only one response per request. If you save multiple responses per request, only the first one is used.
At the top of the app, provide a name for your example response, and select Save Example.
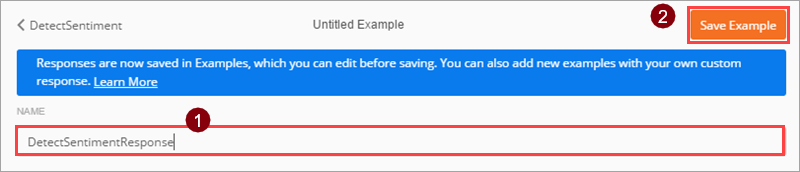
If your API had additional features, you would continue to build your Postman collection with any additional requests and responses.
Export the Postman collection
You can now export the collection as a JSON file, which you will then import using the custom connector wizard. However, before you export the collection, remove the content type and security headers - these were required to make API requests, but they are handled differently in the custom connector.
Under Headers, hover over each header, and choose the X next to the header to remove it. Select Save to save the collection again.

Select the ellipsis (...) next to the collection, and then choose Export.

Select the Collection v1 export format, select Export, then browse to the location where you want to save the JSON file.

Create a custom connector from the Postman collection
You created the Postman collection and now want to use it to create a custom connector. Before proceeding, there are some prerequisites needed to create the custom connector from the Postman collection created earlier:
Download the Postman collection you created
An API key for the Cognitive Services Text Analytics API
A Power Apps subscription
Import the Postman collection
Now you're ready to work with the Postman collection you created earlier. The collection contains most of the required information. You can review it and update it as you go through the custom connector wizard. You need to import the Postman collection for Power Apps and Power Automate.
Import the Postman collection for Power Apps and Power Automate
Go to powerapps.com or flow.microsoft.com and sign in.
In the upper-right corner, select the gear icon and then select Custom connectors.

Choose Create custom connector, then select Import a Postman collection.

Enter a name for the custom connector, then navigate to the Postman collection that you created, and select Continue.


The wizard imports the collection then converts it to an OpenAPI definition named generatedApiDefinition.swagger.json.
Update general details
This example shows the Power Automate user interface, but the steps are similar same across all three technologies. However, any differences will be pointed out.
On the General page, review the imported information from the Postman collection, including the API host and the base URL for the API. The connector uses the API host and the base URL to determine how to call the API.

Update the description to something meaningful. This description displays in the custom connector's details, and it can help others decide if the connector would be useful to them.

Specify the authentication type
There are several options available for authentication in custom connectors. For this tutorial, the Cognitive Services APIs use API key authentication.
On the Security page, under Authentication type, choose API Key.

Under API Key, specify a parameter label, name, and location. Specify a meaningful label, because this is displayed when someone first makes a connection with the custom connector. The parameter name and location must match what the API expects (in this case, the header you specified in Postman). Select Connect.


At the top of the wizard, make sure the name is set to "SentimentDemo", then select Create connector.
Review and update the connector definition
The custom connector wizard gives you many options for defining how your connector functions, and how it is exposed in Power Apps, Power Automate, and Azure Logic Apps. The next section explains the user interface (UI) and covers a few options, but you are also encouraged to explore this on your own.
Review the UI and definition
Before you learn about the specific steps on the Definition page, here's a review of the user interface.
This area displays any actions, triggers (for Logic Apps and Power Automate), and references that are defined for the connector. In this case, the DetectSentiment action from the Postman collection is displayed. There are no triggers in this connector, but you can learn about triggers for custom connectors in Use webhooks with Azure Logic Apps and Power Automate.

The General area displays information about the action or trigger currently selected. This information comes from the Postman collection. You can edit the information here, including the Visibility property for operations and parameters in a logic app or flow:
none - Typically displayed in the logic app or flow.
advanced - Hidden under an additional menu.
internal - Hidden from the user.
important - Always shown to the user first.

The Request area displays information based on the HTTP request included in the Postman collection. In this case, the HTTP verb is POST, and the URL is "/text/analytics/v2.0/sentiment" (the full URL to the API is
https://westus.api.cognitive.microsoft.com/text/analytics/v2.0/sentiment).

The Response area displays information based on the HTTP response included in the Postman collection. In this case, the only response defined is for "200" (a successful response), but you can define additional responses.

The Validation area displays any issues detected in the API definition. Make sure to check this area before you save a connector.

Update the definition
Next you will change a few things so the connector is more user-friendly when someone uses it in Power Apps, Power Automate, or Azure Logic Apps.
In the General area, update the summary to "Returns a numeric score representing the sentiment detected".
In the Request area, select body then Edit.

In the Parameter area, you now see the three parameters that the API expects: ID, language, and text. Select id then Edit.

In the Schema Property area, update values for the parameter, then select Back.


In the Parameter area, select language and then select Edit. Repeat the process you used for ID with the following values.

In the Parameter area, choose text then Edit, and repeat the process you used for ID and language, with the following values.

In the Parameter area, choose Back to take you back to the main definition page.
At the top right of the wizard, select Update connector.
Test the connector
Now that you've created the connector test it to make sure it works properly.
On the Test page, choose New connection.

Enter the API key from the Text Analytics API, then select Create connection.

Return to the Test page. In Power Automate, go back to the Test page. Choose the refresh icon to make sure that the connection information is updated.

In Power Apps, go back to the list of connections available in the current environment. In the upper-right corner, select the gear icon, then select Custom connectors. Choose the connector that you created, then go back to the Test page.
On the Test page, enter a value for the text field (the other fields use the defaults that you set earlier), and then select Test operation.

The connector calls the API. You can review the response, which includes the sentiment score.

A. A Power Apps subscription alone is not enough to create a custom connector using Postman. You also need a Postman collection to describe the API and its operations.
B. While a Postman collection is necessary to describe the API you want to connect to, it is not sufficient on its own to create a custom connector within the Power Platform environment.
C. Similarly, having a Power Automate subscription alone is not sufficient to create a custom connector using Postman. You also need a Postman collection to define the API and its data structures for the connector.
D. To create a custom connector using Postman, you need a Postman collection that describes the API you want to connect to. Additionally, you need either a Power Apps or Power Automate subscription to be able to use the custom connector within the Power Platform environment.
Discussion
Think the marked answer is wrong, or have a better explanation? Share it below — comments appear after review.